2/25/2019

Official iPhone/iPad Activation Lock Removal Service (iOS 12 Supported)

Official iPhone/iPad Activation Lock Removal Service (iOS 12 Supported)
1. How to Use iPhone/iPad Activation Lock Removal Service Online


If you don’t want to bypass the activation lock using the above method, then you might be able to see some results by employing a special service. You can go online and get your iCloud activation lock removed like this:


Step 1. Go to officialiphoneunlock.co.uk and you will see a page with different services listed.


Step 2. Click where it says iCloud unlock.


Step 3. Now you just choose what model of phone you have, input your IMEI or serial number, and then pay the small fee to get your phone unlocked. In a few days, your iCloud account will be unlocked.
Limits of Official iPhoneUnlocks:


It promises to remova activation lock in 3 business days. But some users claimed online that the whole process remained a month.


It promises to issue refund if the service is not working. But they refused to issue refund but gave you voucher as compensation.


You may need to pay more than once.
2. How to Perform iPhone/iPad Activation Lock Removal with Bypass Tool


You can also use a dedicated iPhone activation lock remover if you don’t want to pay for the service. There are a few different applications out there that can do this. They basically work like this, though:


Step 1. Download the lock remover on your computer and install it. (iCloud activation bypass tool version 1.4 is a good one to try.)


Step 2. Plug your iPhone into your computer and open up the program.


Step 3. The software will scan for your IMEI number automatically.


Step 4. In the case of iCloud activation bypass tool version 1.4, you just click Bypass Activation Lock and then the tool will connect to Apple’s servers and attempt to delete the device’s association with the iCloud account.


Step 5. Just wait until it is done and don’t unplug your phone. Reboot your phone once it is done.


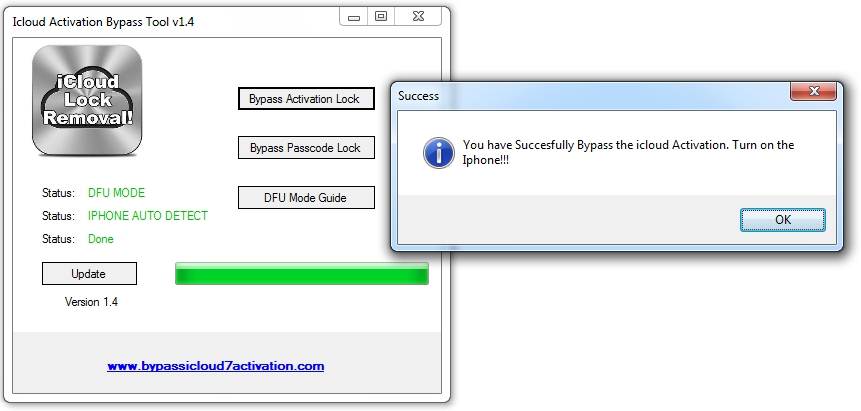
After the process is completed, you will find that the iCloud lock has been permanently removed and there is no longer requiring iCloud activation to use the device.


Also Read:Voice Changing Apps & Software for Skype Sponsor ads:Fix SD Card Error on GoPro Hero


Limits of icloud Activation Bypass Tool v1.4:


There is no way to download this tool.


It's working for just old iOS versions.
3. How to Bypass iPhone/iPad Activation Lock Through DNS Method


You can also bypass the activation lock by pointing your device to a different DNS server. This will allow you to temporarily bypass the iCloud activation lock. Here’s how you do it:


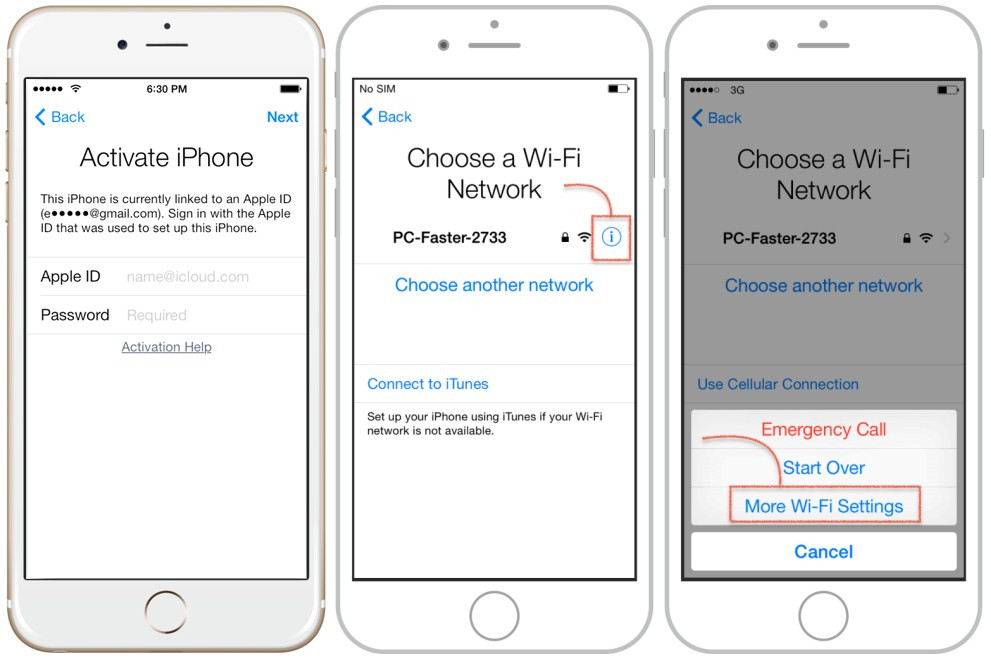
Step 1. When you’re on the activation screen, press on the Home button.


Step 2. Go into the WIFI settings, then tap the little “i” with a circle around it.


Step 3. Input the address of a new DNS server, one that will allow you to bypass iCloud. (You can look online for a good and safe DNS to connect to.)Also Read:Set a Voice Recording as a Ringtone on iPhone Xs/X/8/7/6s
Also Read:Blogging Apps for iPhone and iPad to Start Your Blog


Step 4. Now tap Back > Done > Activation help.


Step 5. You should see a message that says you have connected to the server. Tap the Menu icon at the top of the screen.


Now you should have access to some of the apps on the phone.


These are all viable methods for getting past the iCloud activation lock. Each one works well for a particular situation, so make sure that you use them accordingly.
Limits of DNS Methods:


This way is not 100% working especially for new iOS versions.
Some ways introduced in this post may be out of date and only works for old iOS versions. But the recommended way for iCloud account removal via iMyFone LockWiper is compatible with new iOS version.

Also Read:5 Best Funny Face Swap Apps For iPhone in 2019 Also Read:How to Share Private Home Videos with Family and Friends?

Text Message Notifications Not Working in iOS 12? Here Is the Fix 2019

Text Message Notifications Not Working in iOS 12? Here Is the Fix 2019
1. Turn off Do Not Disturb to Fix No Text Notification

Do Not Disturb is a feature in iPhone that will restrict the device from getting the notifications on locked screen. If this feature is enabled in your device, it can result in the problem. So, the first thing to do when text message notifications is not working in iOS 11 is to disable the "Do Not Disturb" feature. For this, Go to "Settings" > "Do Not Disturb" and disable it. Or, you can go to control center by swiping up the screen from bottom and tap on crescent moon shaped icon to disable "Do Not Disturb".


2. Turn off Bluetooth to Fix Text Notification Not Working

Check if Bluetooth is enabled or not. If yes, disable it to see if you can get text notification normally. Head to "Settings" > "Bluetooth" and toggle it off.


3. Check Notifications Settings on iPhone Running iOS 12/11

Sometimes, we forget even basic things in our busy schedule. If iOS 12 text notifications not working, perhaps there is no sound set for the notifications. To set a sound, head to "Settings" > "Notifications" > "Messages" > "Sound" and select the preferred notification sound.

Also make sure to check that you have enabled one of the notification types. For this, firstly, check if "Allow Notifications" is toggled on. If not, do it now. Secondly, look for "Alert" options and ensure that you have turned on the 3 options.


4. Turn on Recent Notifications to Get Text Notifications

When you enable "Recent Notifications", your device will receive the alerts and notifications even when it is locked. To do this, open "Settings" and tap on "Touch ID & Passcode". Type your passcode and look for "ALLOW ACCESS WHEN LOCKED" option by scrolling down. Turn on "Recent Notifications" and hopefully your problem about messages no notification will be gone.Also Read:Windows Media Player Won’t Play AVI Troubleshooting
Also Read:9 Best Equalizer Apps for iPhone & iPad (iOS 12): Get Ultimate Music Experience


5. Fix Message Notifications Not Working without Data Loss

After trying the above solutions, if still message notification is not working on iPhone running iOS 12/11/10/9/8, perhaps there is a software issue. This can be fixed with the most trustworthy tool which is iMyFone iOS System Recovery. This tool is totally compatible with iOS 12 and performs professionally without any glitch. It helps in fixing various iOS issues without any loss of data. Moreover, iOS System Recovery tool by iMyFone has been successful in achieving praise from many popular media sites.Also Read:Remove the U2 Album from iPhone in 2019
Also Read:5 Best Video Joiner Free for MP4 2018

Fixes to Clear History and Website Data Not Working


1. Apple Fan Provide A Trick to Fix "iOS 12 Not Deleting Website Data"

You can also use a simple trick to fix this problem. Sometimes it works and sometimes it doesn’t depending on why the problem happened in the first place. If Safari is deleting the history of some websites and not others, try this:

Step 1. Go into the settings for Safari and set it to allow cookies by Settings > Safari > Block Cookies.

Step 2. Make note of the websites whose data you can’t erase.

Step 3. Go to the these websites on Safari one at a time and, while leaving them open, go to Settings > Safari > Advanced > Website Data.

Step 4. Swipe the website that you opened and delete. Then tap the back button two times.

Step 5. Tap the Home button twice.

Step 6. Close Safari.

Step 7. Close Settings.

Step 8. Do these steps all over again for each website whose data you’re having trouble erasing.
2. How to Fix "Clear History and Websites Data Grayed Out"

As mentioned, the problem could also be parental controls. If the option to clear history in your Sarafi settings is grayed out, then go to Settings > General > Restrictions, then to Allowed Content, then Websites, and turn any parental controls or adult filters off.


Don't Miss:

How to Clear Safari History on iPhone >>

How to Completely Clear Safari Cache on iOS 12 >>


4. Useful Tips If You Can't Clear Safari History or Website Data

If you’re still having trouble, try one of these useful tips:


Turn off Safari in iCloud through Settings > iCloud > Safari.


Block cookies so that the data isn’t recorded in the first place. You can go to Settings > SAfari > Block Cookies.


Hard reset your device and try deleting the history, cache, etc again.


Reset All Settings and see if that helps. Go to Settings > General > Reset > Reset All Settings to do this.


Permanently erase your website data. You can also erase your data with a third-party application that can permanently erase your history and other private information. This is important because it can keep snoopers from being able to see what you’ve been browsing, and it might even protect you from identity thieves. iMyFone Umate Pro is one of the best data erasers available for this.Also Read:Download Lynda Videos for Free


Also Read:Jihosoft HD Video Converter


Also Read:10 Best Party Planner Apps for your iPhone and iPad in 2019

What's Xilisoft iPhone Transfer?


What's Xilisoft iPhone Transfer?

Xilisoft iPhone Transfer is one of the many iOS transferring tools available today. It can help you get around a lot of iTunes’ restrictions. For example, using Xilisoft iPhone Transfer, you can transfer music and other media that you didn’t necessarily purchase from the iTunes store.
Some of its main features include:

Also Read:iPhone/iPad Keeps Restarting? Here’s the Fix!

Also Read:Add Background Music to Video Online for Free


You can manage your music easily from your computer, without iTunes.


You can back up your music and store it anywhere you want.


You can transfer music from your iPhone, iPad, or iPod to your computer or iTunes.


You can transfer music from iTunes or your computer to any iOS device.


You can share data with several iOS devices at once.


Xilisoft iPhone Transfer Software Review
Test & Review

Xilisoft iPhone Transfer is a decent third-party device manager for your iOS device, especially if you want to bypass the restrictions that come with iTunes. The interface is fairly simple and it loads up very easily. From the main screen, you can simply click around and do things like sync the library on your phone with iTunes, manage the media that is on your device, back up your messages and contacts to your computer, and transfer music back and forth, among many other things.

It is a very easy to use tool and it loads up fairly quickly. Transfer times are reasonable as well. Overall, it’s not a bad tool to use if you need to transfer your iPhone data between devices with different Apple IDs, etc. It’s also good to have if you want more control over your backups.

Pros


You can add songs to your library, etc, without using iTunes. In fact, this program takes over most of the functions of iTunes, so you may not have to use iTunes again, except maybe for updates and phone back ups.


You can transfer most kinds of media freely and without restrictions.


You can back up data to your computer, and potentially external devices, too.


It’s fairly simple to figure out, and most users should get used to the interface within a few minutes.

Cons


It’s not free. It does come with a free trial offer, though.


It cannot support to view or transfer HEIC photos on iOS 11.


It can’t restore crashed iTunes library.Also Read:Top 6 Best Alternative Sites to YTS Torrent Movie Website 2019

Also Read:How to Factory Reset Your iPad without Passcode or iTunes

Delete music from iTunes from PC/Mac 2019


Method 2: Delete music from iTunes from PC/Mac

One can easily delete music files in the iTunes library directly from a PC. To remove music from iTunes on a Mac or PC follow the following steps:

Step 1 : Open iTunes on your pc or mac.

Step 2 : Go to the iTunes library and find the song, songs or albums you want to delete and then select them.

Step 3 : Click on "..." icon and then tap Delete. You can also directly press the delete key on your keyboard to remove the selected items.

Step 4 : After hitting or choosing delete, iTunes the pops up a window with several options that let you decide what to do with the file. These options include Remove Download, Delete Song, Keep File, Move to Trash and Cancel.

Step 5: Choose the option to use, and then empty the recycle bin to remove the file from your computer completely.


If you had previously synced your iDevice to iTunes then to remove the deleted songs connect your iPod or iPad to your PC/Mac and sync the music again with iTunes. Once the sync completes all the files deleted from iTunes will be automatically erased from your iDevice.


Method 3: Delete music from iTunes from iDevice

On your iDevice, you can use the music app to remove any of the songs you do not like anymore.


Step 1 : Launch the music app on your iDevice.


Step 2 : Then find the music file you want to get rid. It can either be a song, an artist or even an album.


Step 3 : Tap the "..." next to the media file you want to erase which will then open a new menu.


Step 4 : From the menu choose Delete.


Step 5 : If you are using iCloud Music Library or not, you might see different options. You can see either Remove Downloads or Delete from My Music.


Step 6 : Choose the delete option you want to use, and the files will be deleted from your library.


If you choose Delete from My Music, the file will be deleted both from your device and music library. On the other hand, if you decide Remove Downloads this eliminates the data only from your device and leaves it on your music library.Sponsor ads:

Gihosoft Free iPhone Data Recovery:https://www.gihosoft.com/iphone-data-recovery-free.html

Gihosoft iPhone Data Recovery Free

Free iPhone Data Recovery Software for Windows/Mac

Recover up to 12+ types of files, including contacts, SMS, photos, WhatsApp, Viber, notes, etc.

Restore lost data from iOS devices directly or from iTunes and iCloud backup

Recover iPhone data lost due to iOS upgrade/jailbreak, accidental deletion, device lost or broken

Support all the latest iPhone, iPad and iPod Touch

Both Free and Pro version.

If you lost data after you updated to a new iPhone, you can always use Gihosoft iPhone Data Recovery to get the data back from the old iPhone or backup.You may also like: iphonerecovery.com

If you use android phones, please choose Gihosoft Android Data Recovery.

With Gihosoft Android Data Recovery, no longer afraid of data loss!

Must read:Youtube video downloader for pc

Gihosoft RePicvid Free Photo Recovery Software provides a free photo recovery software for windows to help users recover the deleted or lost photo for free.

Jihosoft Android Data Recovery: the best Android Data Recovery software for Windows and Mac to recover deleted contacts, messages, photos, videos, WhatsApp and etc from Android devices.Tips:How to transfer messages from iPhone to iPhone

jihosoft Free iPhone Data RecoveryAlso Read:Top 6 Best Alternative Sites to YTS Torrent Movie Website 2019
Also Read:How to Factory Reset Your iPad without Passcode or iTunes

Download Movies on iPhone for Free? Learn the Best Way

1. Top 5 Free Websites to Download Movies for iPhone Below we have detailed some of the best and legal websites that allow you to download m...